

 If you need a little reminder, leaving a comment below this post gives you another chance to be one of two crafters who will get ten Promarker pens of their own colour choice as an early Christmas gift from Letraset.
Basic rules, leave a comment as often as you like this week, if you comment on every post then your name will go into the hat 7 times. Winners will be drawn on Monday. Scroll down to Mondays post for full details
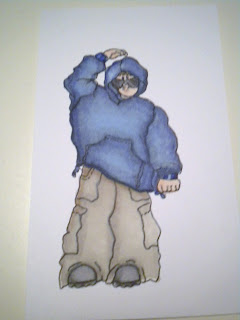
I found it really hard to colour dark clothes with alcohol markers, or any sort of markers come to think of it - they always looked flat, and sometimes the dark colours totally obliterated any detail of the stamped image. Then I had a little play, and a lot of practice, and this is how I do it now. Although the colour isn't very dark and flat looking, the overall effect is one of a dark blue hoodie.....
.

Here's the finished image. Another stamped image I got in a swap, so I don't know who made the stamp. It was suitable for my purpose because it had a large expanse of clothing!
 Promarkers used:
indigo blue
cornflower
china blue
powder blue
cool grey 3
trousers:
Khaki
Pastel beige
warm grey 2 & 3
 I coloured all around the hoodie in indigo blue, filling in areas like the inside of the hood that would be very dark
then I took china blue and went further into the clothing, blending it with the indigo

Did the same with cornflower

then filled in the whole image with powder blue

I added more shadow with the cool grey 3, and a touch more indigo in the deepest folds/seams, then went over the whole thing again with powder blue

the trousers were coloured all over with pastel beige

shadows added with khaki, then blended with pastel beige

then I added some darker shadows with warm grey 3, and went over the whole lot again with the pastel beige
Can you see how the colours on the top are fading and appearing to blend more as the ink dries?
 and here's the finished dude!
I hope this has helped you a little, I haven't had time to make a card with the finished image I'm afraid, it will go into my 'ready-to-roll' folder, where I keep a selection of coloured stamped images, paper flowers, die cuts etc, all ready to make a card in minutes
Lots of you have commented that you don't know how on earth I manage to tote craft stuff backwards and forwards across the Atlantic. The answer of course is that I have doubles of a lot of things. Two Cricut expressions, two cuttlebugs, two crop-a-diles, two ATG guns....and so on.

Lots of you have commented that you don't know how on earth I manage to tote craft stuff backwards and forwards across the Atlantic. The answer of course is that I have doubles of a lot of things. Two Cricut expressions, two cuttlebugs, two crop-a-diles, two ATG guns....and so on.
The Gypsy has eliminated carting all my Cricut cartridges backwards and forwards, although I don't enjoy using it at all, I must admit I prefer to slot the cartridge in the machine and cut in the old-fashioned way.
What I only have one collection of, quite sensibly is my cuttlebug embossing folders, nestabilities, promarkers and stamps (I limit myself almost exclusively to acrylic or cling rubber these days). Easy enough? Well yes, it would be, if I wasn't prone to these ridiculous urges to pack enough stuff to keep an army of crafters busy for weeks. For example, I was in bed last night, and suddenly thought 'grunge board! grunge board! Oh my gosh, I haven't packed any grunge board', so I got out of bed, plodded wearily into the garage and started digging around for the grunge board. Now this took some time, I knew I had some.............somewhere. Ah yes, here it is, still intact in the packaging, as it was when I bought it about two years ago. Now it is packed, in my bursting-at-the-seams suitcase, and all I need is for someone, somewhere, to tell me exactly what grunge board is and what the heck I am going to do with it, apart from take it on a transatlantic holiday that is.
Yes, I have been to Tim's site, yes, I think the man is a marvel, yes I have seen him work with grunge board, and no, I still have no idea how it will fit into my life, let alone make it worthwhile getting up from a cozy bed in the middle of the night.
And so the packing saga goes on....and on....and on. Now where did I put that tub of bookbinders glue that I need for ...ermm, some project or another.
See you tomorrow

That's a real nice photo tutorial. I can't wait to try these promarkers myself, so I'd love to take a chance on the candy.
ReplyDeleteThanks for the tut! I have never used Pro Markers and would love to win! Thanks for the chance :)
ReplyDeleteYippee I have these colours so will be giving this technique a go, really like the idea of using grey for the shading:) I have grunge paper and TH book but thats as far as its went lol. Good luck with the packing, that glue is under that magazine over there by the chair lol
ReplyDeletePinky
I love the way you have used your colours,wish I possessed all thoses pro-markers,then I could give it a try,lol.
ReplyDeleteOMGosh... I would have to pack up and take everything I have.. could never decided what I could do without!
ReplyDeleteLove your colouring ♥
Hi Enfys, that was a great tutorial. Never seen it explained so clearly. I smiled when I saw that image, it looks like my son some 8 years ago when he was an adolescent he used to look like that for a while. Fortunately it passed HAHA!! HUgs, Frea
ReplyDeleteThank you so much for theTutorial! I will need it someday! But Yet I have not andy Copics or Promarkers! Your colouring is lovely!
ReplyDeleteYou know how for sure! :o)
love the coloring! you make it look so easy!
ReplyDeleteThanks for showing how to color clothes with promarkers. It looks really cool. I can't wait to start working with mine. X Anita
ReplyDeleteYour coloring is beautiful-and I always get a chuckle reading your stories!
ReplyDeleteThank you for the tutorial. You are really good!
ReplyDeleteIt's amazing what a little play will produce in our crafting.Thank you again for your hints and tips - the pics were very helpful.Thanks again for the chance to win.Take care.Debs x
ReplyDeleteWith every post I hope more and more to be one of your 2 lucky winners!! These cards and examples you show are really inspiring.
ReplyDeleteThanks (again!!),
Carin (digicatonet)
Hi Enfys thats a fabulous tutorial really very exact and is very helpful for showing exactly how far to bring out the colouring to layer it. Stunning image love the baggy look of it. With love and hugs Shirleyxxxxx
ReplyDeleteExact teachings on how to color...I love it....thank you so much for sharing your precious time.
ReplyDeleteGreat post, Enfys. Thanks for the tutorial...and the chuckle. :-)
ReplyDelete*smiles*
debbi
Thanks for the tutorial! I love your stories, it makes me laugh before I go to work!
ReplyDeletebrigitteetleschats at hotmail dot com
Interesting to see how you do the shadows. I've been struggling with that. Thanks for the tutorial.
ReplyDeleteHi! Today is my birthday and some Promarkers would make a great gift :-) Thanks for sharing your talent with us.
ReplyDeleteYou make the colouring seem so easy Enfys. Maybe one day mine will look like yours. My early Christmas wish for you is to suddenly find the reason for you having spent hours looking for the grungeboard, and carrying it across the waters, so that you can tell the rest of us what and how to use it. Warm wishes.
ReplyDeleteEnfys - you made me chuckle this morning when I read your post about knowing you had something and it taking so long to find it!! That's the story of my life. Thanks for the chance to win some Promarkers. Have a good day.
ReplyDeleteDonna Wilson
www.dailygracecreations.blogspot.com
Thanks for the tutorial... I am still trying to master coloring and your tips and info helps so much! Thanks for the chance to win these awesome markers. AJ - aj_822@yahoo.com
ReplyDeleteNow those you shared, were I to win, would be the collection of markers I would select. Have fun with the grunge board and your Cuttlebug. I love cutting shapes but I use Grunge paper mostly. Thanks for another chance at those markers.
ReplyDeleteThank you for the info today. It's definiitely a learning curve for me right now, but I at least feel that I've improved, especially since I've watched your videos. I love your "stories" also. I'd love to win one of the sets. Thanks, dj1952
ReplyDeletethank you sweetie for the tutorial
ReplyDeleteit helps a lot, perfect coloring
i hope to win some promarkers
hugs angelique
Hmmm...I'm pretty sure I have some unopened packages of grungeboard too... I'll wait for you to use yours so I can see what you do with it! Thanks for another helpful coloring lesson :)
ReplyDeleteavrawill@wideopenwest dot com
I don't travel overseas, but when I go to Canada in the summer I pack more supplies than I need. My daughter does not live close to a craft store so I take a lot of stuff.
ReplyDeleteThanks for the tutorial Enfys! I'm gonna need all the help I can get when all those markers I ordered arrive! Have a safe trip home!
ReplyDeleteDebbyS
Very good work!!!
ReplyDeleteI would love to see what you do with this image now. Are you going to use him on a card or layout for scrapbook? He looks great by the way. Just love how these markers blend so well.
ReplyDeleteThanks for the morning giggle (re the grunge) I too have a number of items in my stach that I just had to have but have still not figured out how or where to use!
ReplyDeleteOh the backing nightmare! I have the same thoughts about grung board. What to do with it. The other thing are all the fancy tags people make. I understand the ones for gifts but some are just very fancy tags. I love them but what does one do with them.
ReplyDeleteThanks for all the coloring tips.
Putting my name in again for the markers!
ReplyDeleteThanks for the chance to win.
You know I love your site. ((hug))
TR
Thanks for demystifying the dark clothes riddle. I also can't get it right but with a bit of your instructions I think I might get it right next time. Thanks.
ReplyDeleteStampersue
X
What an excellent tutorial, anyone could follow this and the end result was great. Would really like to try these markers, thank you for the chance to win.
ReplyDeletejman4@comcast.net
he he he he!! oh en you do make me giggle!!!!! hope you don't go back to the suitcase and find it has pinged open like a jack in the box!!!! hugs Lou xxx
ReplyDeleteThat shading is amazing. Thanks for the step-by-step pictures.
ReplyDeletelroberts00@msn.com
Enfys, You are so funny and sound a lot like me. I always pack too much. Thanks for the tutorials on coloring and the opportunity to win some Promarkers.
ReplyDeletetimmermanp@bellsouth.net
Great tutorial! I hope you get everything packed and have a safe trip :)
ReplyDeleteGood morning Enfys - I LOVE your blog - you really get me smiling in the morning! and no, I can't imagine hauling my stuff around all the time - I have a hard enough time going to local retreats and crops!! Thanks again for the info on ProMarkers - I'm just starting my collection and need more than 10 to get to your suggested list!
ReplyDeletejackie
Thanks for the tutorial on how to colour with the ProMarkers. I would really love to try these!!!
ReplyDeleteThanks for the tip on colouring dark colors! I've had the same problem but I will try on your technique.
ReplyDeleteYou are a marvel, showing us all how to color all our art work. TFS. Travel safe.
ReplyDeleteDonna C.
goCricutgo
Many thanks for the tutorial - I find darker colours difficult so I'm sure it'll be helpful.
ReplyDeleteGreat image! Thanks again for the tips on coloring it in....funny story about the grunge board...I have a package that I bought about 2 years ago also still not used...but you know someday :) Don't know if it would have got me out of my bed to pack it but like you say "you never know"...
ReplyDeleteGreat tips, thanks for sharing! What a cute stamp :)
ReplyDeletewow thankyou for the fab tutorial its great i always struggle with blues xx
ReplyDeleteThanks for the tutorial. From what I've seen and read, Promarkers are a great product!
ReplyDeleteI love your step by step tutorials! Thanks!
ReplyDeleteGreat tutorial thanks!
ReplyDeleteDebe
debmevans@btinternet.com
Very nice. And it's look so fantastic. Hugs Nat
ReplyDeletePerfect tutorial! Thank you! Win or not... I am going ot get some of these markers. :-)
ReplyDeleteYES! Love this tutorial! I am a newbie at Promarkers, every tip helps! Thank you for the photos step by step!
ReplyDeleteThanks for the tips on how to use the markers.
ReplyDeleteThanks so much for the tutorial, I love the way you've coloured him in. Please add me to your draw for today, thanks so much.
ReplyDeleteGreat tutorial. Another printout to add to my growing stack! Thanks again for all your work and for sharing. God Bless
ReplyDeletemyrnan2006@yahoo.com
Great step by step tutorial. I can't seem to find any stores around me that carry ProMarkers so I am really hoping to win a set as I have now started coloring my stamps but all I am brave enough to use is colored pencils. TFS
ReplyDeletebhoward at kci dot net
Thanks for an awesome tutorial on coloring, technique will probably work using any markers but I really want the promarkers. Thanks for giving the opportunity to win. Have to check you out each morning. TFS
ReplyDeleteSlomoMom
slomomomcbl@gmail.om
Beautiful coloring on those clothes En! I have tons grungeboard because Tuesday morning had a rediculous sale and it cost me almost nothing. sometimes I'll use the plain pieces instead of chipboard for album covers, etc. Other than that, it sits in a very large stack! hugs to you, good luck on the packing. eileen
ReplyDeleteWOW, I didn't realize that it took so many colors to make a shirt blue! lol You did a wonderful job on it
ReplyDeleteAnother fantastic tutorial!
ReplyDeleteGreat Tutorial, Enfys! And beautiful job coloring!
ReplyDeleteWouldn't you like to travel to the West side and visit me. I love your directions for this card and how much better it would be if you sitting next to me so I could quiz you as I attempt to color with my promarkers that I hope to win. I have to admit, I wondered how you packed all your stuff too. Oh how I would love to have 2 of my things though I doubt I would be any more productive. I love reading your adventures. You are such a delight!!! Don't worry about the glue, you can always get some when you get home.
ReplyDeleteThanks for a great tutotial and the chance to win some fabulous Promarkers!
ReplyDeleteOne question, what colors should a person start with when getting promarkers? I don't have any and if I win I would like to be ready with my color choices. Sadly, if I don't win, I want to give my DH (Santa too) the list.
ReplyDeleteA fabulous tutorial, can't wait to give these colours a go!
ReplyDeleteHugs
Anj
xx
Thanks for the little tutorial. Great help!
ReplyDeleteYou are so funny! And you sound like me when I'm going somewhere to do some crafting! At My Happy Place, where I do my scrapbooking, I keep a lot of my scrapping supplies and cart other things back and forth. When I go to a crop for a day or a weekend away, OH MY!!!!! I don't know why I take all that stuff and then never use it!
Have a pleasant trip back to the UK!
Thank you for all of your tips. They are greatly appreciated.
ReplyDeleteGreat tutorial. I'm right there with you and the grunge board. He's done amazing things with it, but mine sits unopened until I can figure it out. misha_113@yahoo.com
ReplyDeleteThanks you so much for continuing to inform us on how to use these markers. It has been extrememely helpful!
ReplyDeleteJeanH
j20.hum@gmail.com
Awesome "dude" Enfys!! Love the colours! I had to laugh at your grungeboard comment, I purchased a two pack at Tuesday morning for a reasonable price, thought "OH yeah, can't wait to play with this..ahhh yeah, it's now in storage with the rest of my crafty stuff. When I packed some things to hopefully make cards during this time in my life, I realized, I couldn't narrow it down enough, so decided, I would stick with word puzzles, maybe some cross stitch (it's been forever!) and friend ship bracelets. LOL Keep it simple, right! Best to you Enfy's!
ReplyDeleteCrafty Hugs,
Lisa Sturgill :)
Thank You Enfys! I have discovered that once Promarkers dry they don't look as obviously layered. This was a hard lesson since I kept going over and over my stuff just to have it finally bleed out of the lines! I can't imagine living in 2 places though once the kids are gone, summers in Alaska and winters in warmth sounds good;)
ReplyDeleteHugs,
Denise
Thank you for showing step by step makes it so easy to understand!
ReplyDeleteGreat tutorial. I have never colored with markers and would love to try them!
ReplyDeleteAnother great tutorial Enfys. Thanks again for the morning chuckle about your packing. I am sure I wouldn't be as organized as you if I had to move every three months even with two of most things. I also still prefer to use the expression for cutting but am trying to get more use out of my gypsy. Thanks for a chance to win.
ReplyDeleteAmazing colouring, thanks for the tutorial, still practising, some day might have something decent to post. Love the chance to win these colour combos. Carolxx
ReplyDeleteawesome...thank you for showing how you use the markers.
ReplyDeletethanks for the chance to win so i might try these wonderful markers.
Marlene from NY
I love the way it came out. I would love to try these. Thanks for a chance.
ReplyDeleteyou made me even more curious about promarkers... i used different painting mediums before but promarkers amazed me how the colors blend each other...
ReplyDeleteohhh thanks for the wissy wassy crafting delimmas...my BS is fine
lovelylorns@gmail.com
Another great tutorial! Thanks so much!
ReplyDeleteMaria S.
scrapbooknut2002 at yahoo dot com
Thank you so much for the tutorial! I use inks and watercolors, and have been wanting to try the markers because the colors are so vibrant and look as though you have more control over the final look a bit more - just haven't wanted to make yet another investment in another medium. You show a good reason to consider why it would be smart!
ReplyDeleteBlessings, Donna
grandma4five
Enfys, thanks for this. I will have to give this a go as I do struggle with darker colours. Best wishes, Kym xxx
ReplyDeleteThanks for this great tutorial!! I have had the same problem with coloring dark images. This looks great. Love your stories about your travel and packing adventures. I can only imagine, cause when I just go for a week or so I pack waaaaay to much. Have a great day. Hugs, Sharon :o)
ReplyDeleteDark colours are so hard to use, thanks for your tutorial!
ReplyDeleteI have more trouble with reds, because the ink is so intense.
Great tutorial. That stamped image reminds me of my sone when he was younger! I don't know how you do it. I could not leave anything behind! But, knowing you'll be back in a few months would make it easier. But whar if you NEED sonmething you left behind? Like what if you suddenly "get" the grungeboard thing? It is good you remembered it!! LOL
ReplyDeleteLove how you colored the hoodie. Very cute. You are so talented. You cracked me up about getting out of your bed to get the board- I have no idea what your talking about and with the temp being in the low 20s there is no way I am climbing out of my warm bed to go anywhere. I hate to get out to go to the bathroom. LOL Thanks for another chance to win the markers. You Rock!!
ReplyDeleteYour dude is awesome. Thanks for the instructions on coloring him.
ReplyDeleteJenny Kozar
Good thing no one at work came in to see what I was laughing so hard about - grunge board. You are just hysterical!
ReplyDeleteWhat a cool dude! love what you did with these promarkers! would love to give them a try!
ReplyDeleteEnfy's. Thanks for the tutorial on dark clothing. I have been trying some and I appreciate your help. I also love the story about your packing. I had a visual of you rummaging around in the middle of the night, and got a chuckle. How often I wake up with the same desire to find something, and I am not going anywhere! LOL. Love your stories! God bless, Pamela
ReplyDeleteI would love to give it a try!! Maybe Santa will bring me some!! Great tut!! TFS!
ReplyDeleteI love that image, it so looks like these kids dress these days! Baggyclothes with their underwear showing halfway down their... ok you know what I mean. Sometimes I get the urge to run up behind them and de-pants them! I know... shame on me.
ReplyDeleteYou know I, too, have some grunge board that I have never used! I found it at Tuesday Morning at a rediculously low price or I'd never have bought it! I have found that having a strip of it on my table works wonders for making the mojo show it's head again. When I get stuck, I pick up the very pliable, maliable grunge board and wring the daylights out of it, while I think! Works for me!
Hugs, Jess
I don't have any promarkers yet but would LOVE, LOVE, LOVE the chance to win them. I love your tutorial and your photos. Thanks for the chance to win. I am having a giveaway at my blog too .. www.twopinkpeas.blogspot.com Terri terrico3@ameritech.net THANKS!!!
ReplyDeleteThis was a great tutorial, Enfys. I am actually starting to think that I could do this - if I can get my hands on some markers! Tehee. Thanks so much.
ReplyDeleteYour tips are really useful to someone who has only just started using Promarkers. I only have a few, but love them to bits, and use them on every card now. Would love to win this candy !!
ReplyDeleteThanks for the tutorial. I find both large areas and dark colors are hard to work with but love my Promarkers.
ReplyDeleteBonnie
Fantastic to have another tutorial, going to find it really useful, thanks. Thanks for another chance to win too. Love your story lol Hugs lin
ReplyDeleteAnd the next question would be "what format do you use to store your stamps?" Thought of you yesterday after a quick stop at DD for a vanilla creme filled ... good, but not as good as the shop in Asheville, NC!
ReplyDeleteJoan in St. Augustine
Than you so much for the tutorial. You make everything seem so easy.
ReplyDeleteCherylann (prinkles)
prinkles@woh.rr.com
Thanks for the tutorial and in site into how you pack. I don't even go to crops anymore because I think I have to take everything with me, then I spend so much time talking I don't get anything done and have to luge it all home and unpack - couldn't imagine going for any length of time.
ReplyDeleteWe really appreciate the time you take to show us how to use the promarkers!! You still tell the greatest stories. Safe journey home for you both.
ReplyDeleteThanks for the great tutorial. Now I just need some markers so I can practise.
ReplyDeleteThanks for the tutorial Enfys. This may lighten your Transatlantic load a little. Have you checked out Penny Duncans Blog? She has SVG files (Shaplies) that look similar to Nesties and you can cut them on your Cricut. She offers them free at her site or you can purchase the DVD (which is way easier) This is a link to her blog
ReplyDeletehere. ~Diane
another great tutorial
ReplyDeletejust need to get sopme more pens
thanks for the great tutorial, Enfys
ReplyDeleteFab tutorial - thanks!
ReplyDeleteYou have taught me so much about using markers and I thank you. tfs
ReplyDeletecruella63703@yahoo.com
Thanks for the fabulous tips. I have always really wanted to use these, but don't have any because I thought I could never understand how to and that it wouldn't look good, but after seeing this I think that I might have to get some (or win some) and try them!
ReplyDeleteGod bless you honey, I love reading your blog. As for the packing, you sound like my sister and myself. Always afraid to leave one little thing behind. Now pray tell me why you are going to the UK while it is so cold. I thought that was what Fla is for. I just won on Tim's blog and am waiting to get my goodies. I ordered some grunge paper to have a try at making the ponsettia he made in one of his tag videos. I have never used it either. Thanks for the tut, I love your explanations, you make it seem so easy. YES I want to win some promarkers!! I have a few since you turned me onto them and I love what I am doing with them so far. Goodness I am long winded.
ReplyDeleteHave tried dark colors and ended up with? Appreciate the tutorial especially with the pics makes it much easier to understand. Thanks for the chance to win.
ReplyDeleteLove the tips! Happy travels!
ReplyDeletepawprintspetsits at yahoo dotcom
Thanks for the tutorial En. Good luck with the packing, your blog posts always make me smile.
ReplyDeleteTake care
:) xx
Thank you for the tutorial! Love the stamped image! Don't forget to pack the thing-a-mi-gig! :)
ReplyDeleteThanks for all the help on coloring, maybe I will get this Shadow thing done someday!
ReplyDeleteThank you so much for this tutorial. I have wanted to try these kinds of stamps but wasn't sure how to color them in or even what type of markers to buy. This tutorial was extremely helpful.
ReplyDeleteThanx for the fab Tutorial, i have jotted down the colours for to have a go later.
ReplyDelete(hugs)
Trish (-:
This is a great technique to know. I had problems with darker colors. I will give this a try.
ReplyDeleteThis is amazing I always have trouble with blending darker colors. Once again you amaze me!
ReplyDeleteI love the shading you accomplish with these markers. Thanks for the opportunity for someone to win them!
ReplyDeleteThanks for the great tutorial - I am amazed at how the different shades all blend together. I have no Promarkers, so thanks for the chance to win some
ReplyDeleteI have never tried any of these markers but I enjoy seeing how poeple have used them. The look so beautiful.
ReplyDeleteEnfys,
ReplyDeleteThis would make a great birthday present. I have one on the 14th. Tom got me two trees with lights to go on both sides of my front door. I am almost done except for a few cards to send out. When are you leaving? Thanks for the giveaway as usual. You are the best craft person I know on the promarkers. I hope after the holidays slow down I will be able to craft.
E-Mail: davidbayles@sprintmail.com
You are so funny...your comments are as priceless as your cardmaking!!! I too have some Tim Holtz grungeboard that I bought about 2 years ago, and every once in a while I catch a glimpse of it (like many of the other "must have" items I bought) and tell myself..."I need to do something with that soon"!!! Anyway...thanks for working hard to show us how to best use the promarkers. It's another "must have" that I have not purchased yet, but every cardmaker in the world seems to be using!! I would like to give them a go, so if I do win, I will be right back here rewatching all your tutorials so that I can get it right!!!
ReplyDeleteThanks, Patty
Your tutorials are soo easy to follow! thank you
ReplyDeleteMichelle
jovian7@hotmail.com
Thanks for the great tips I am anxious to give it a try
ReplyDeleteRuth
What a cute dude. You do amazing work with your Promarkers.
ReplyDeleteWow, you did a great job on this card and tutorial. I understand it but it doesn't make the way to my hands to make it happen. I would love to try these markers, just can't swing it right now.
ReplyDeleteWow, you did a great job on this card and tutorial. I understand it but it doesn't make the way to my hands to make it happen. I would love to try these markers, just can't swing it right now.
ReplyDeleteGreat coloring and great tips on using the Promarkers. TFS
ReplyDeleteThanks for the awesome tutorial! I am can't wait for the chance to buy some Promarkers!
ReplyDeleteHappy Holidays!
~Angel
Thanks so much for taking the time to make these tutorials. I love watching them and learn so much, would love to try these markers out.
ReplyDeletethanks
Scrapsister
{arizona}
Thanks for showing me how to color things like denim so they're not just a flat blue!
ReplyDeleteHope you keep the tutorials coming!
That is amazing! It looks like a watercolor painting!
ReplyDeleteGreat job on the coloring, and thanks for the tutorial!
ReplyDeleteThanks so much for the Promarker tutes and the chance to win some. I am not very good at coloring with markers...but, I want to be and tutes like this help!! Thanks again. Rockin Robin C
ReplyDeleteTFS I agree with several of the last few comments, haven't been able to swing the markers yet but really want to try them out.
ReplyDeleteHave a great trip. My packing tip is to get everything I think I will use, then cut it in half and sometimes in half again. Cuts way down on luggage and rearely really need something I have left at home.
Shari . . .
Enfys, Thanks for posting about dark colors! You may (or may not) remember that I had emailed you a while back to ask whether Promarkers were available in brighter/darker colors, because I notice a lot of your work tends to be lighter. You're right, the darker colors aren't as flattering to the image as lighter ones. It's still good to know how to use them!
ReplyDeleteYour story about packing and digging out the grungeboard cracked me up! Oh, I have LOTS of stuff still in the package that I bought two years ago...or more. But would I get rid of it? Noooo! Still intend to use it for something great.
Great tutorial. These are so useful! So nice that you take the time to guide others into the world of shading and toning. Have a nice weekend!
ReplyDeleteHugs, Tiiti
Thank you for the tutorial and the laugh about packing things we'll never use. I find myself doing that all the time.
ReplyDeleteThank you. I love your stories.
ReplyDeletehttp://iwycd.blogspot.com/
Your coloring is beautiful! I haven't used Pro Markers yet. Thank you for the chance to win some!
ReplyDeleteGreat coloring techniques. Thanks for sharing.
ReplyDeleteI would love the chance to try the ProMarkers. Love your projects.
ReplyDeleteBarbara A in AZ USA
What's that rule? If you don't use something for one year or is it two then discard it. Heck my rule is at least 20 years before I even look at it and then think about discarding it. I just know I will use it someday! I'd be so excited to win your Promarkers I'd scream!
ReplyDeleteHugs,
Mary Ann
mahuntington@wavecable.com
I love this blog Enfys. I would love to win the Promarkers! I can't wait to try them soon! Your coloring and shading techniques are beautiful!
ReplyDelete-nu2scrap-
Enfys,
ReplyDeleteGreat tutorial... Good luck to everyone.......
E-Mail: davidbayles@sprintmail.com
omgosh...you make it look so easy! I know i would never be able to get it to look as good as you do!
ReplyDeleteThat was a very helpful tutorial. TFS!!
ReplyDeleteamandaremus at gmail dot com
Fabulous tutorial! Now if I only had a set of markers to practice with. LOL!
ReplyDeleteLove the detail of how you did the clothes. I am just getting into the stamping and coloring aspect and enjoying it. I have a few copic markers and would love chance to try the promarkers. Thanks.
ReplyDeleteWaw thanks for the chance. Hugs,moni
ReplyDeleteThank you so much for your tutorials and the chance to win!!
ReplyDeleteI really do not envy you having to pack all your craft things up then and unpack them. Great image and very effective colouring.
ReplyDeleteKim xXx
Great tutorial. If I win, I will try this out. why do we as crafters feel we need to hove everything, and lots of it, and tote it everywhere, even if we haven't used it for two years??? lol
ReplyDeleteThanks for showing us how to use them. I had no clue now i do... now just to start that collection!!
ReplyDeleteYour shading is beautiful. I would need some practice on that.
ReplyDeleteSue
rolfe974@prodigy.net
Great tutorial! I don`t know what i do wrong, but i really don`t like to use the blender. I think the paper looks like it is getting hairy, lol. I think your image look fabulous. Hugs...mona
ReplyDeleteSo much to learn from your photos. Would like to win :)
ReplyDeleteAwesome tutorial! as always, great card, TFS
ReplyDeleteThank you for showing how to color darker clothing! You color so realisticly!
ReplyDeleteOnce you use that Grungeboard, you will know why you need to give a home and tran-Atlantic flights for a few years... it is fantastic stuff! Check out Tim's 12 Tags of Christmas tutorials and if you are not inspired to use your Grungeboard and one of his Sizzix dies, have your husband give you mouth-to-mouth to bring you back to life!
You are so right..let it dry and let it do it's stuff. Maybe on your cards..mine looks like a first grader got at my card! hehe..
ReplyDeletejcamp2020 at aol dot com
Great tutorial on the colouring!
ReplyDeleteAnd I love your story about how you pack craft stuff for traveling. Still don't know how you do it! I have stuff in my stash that is still in the package too, but at least it stays in one room!
Ooohhh Enfys you made me laugh!!! There are craft shops both sides of the Atlantic you know!!! Funny thing is I know how you feel!!
ReplyDeletelol
Hugs
Dawn xx
Thank you for sharing your knowledge and talent with the rest of us! Your work is beautiful and I love your stories!
ReplyDeleteThanks for showing the use of dark colours Enfys, I always struggle with the blue.
ReplyDeleteHugs Linda
Another great tutorial En.
ReplyDeleteFancy getting out of bed for grungeboard. I think we all have is stashed away but it rarely sees the light of day. I did make a phone case with mine though at the beginning of the year and I'm still using it so it's certainly strong!!
Hugs Lisax
I Love this digi tutorial...I'm really hoping that I win so that I can try my hand at digis. Thanks for the chance to win!
ReplyDeleteMinta
mintab@gmail.com
http://mintascreations.blogspot.com/
Here's hoping I win a set of these wonderful markers! I am anxious to try to duplicate your ideas.
ReplyDeleteThis stamped image reminds me of one of my younger nephews. He always seems to be so comfortable in clothes that are about four sizes too big!
ReplyDeleteThanks for the great tutorial, Enfys! :o)
Ohhhhh my fingers are crossed to win these, I can't wait to try them for myself!!!
ReplyDeleteI really like to see how you do your coloring. Thanks for sharing.
ReplyDeletei would love to win some promarkers and get to try out these techniques
ReplyDeleteGreat tutorial. Thank you. We just bought some alcohol markers and are learning to use them. We have been enjoying your tutorials.
ReplyDeleteI found this interesting as this was a different technique to colouring hair. I can see that I'll just have to keep referring back to your tutorials. Thanks for sharing these, it's really helpful!
ReplyDelete