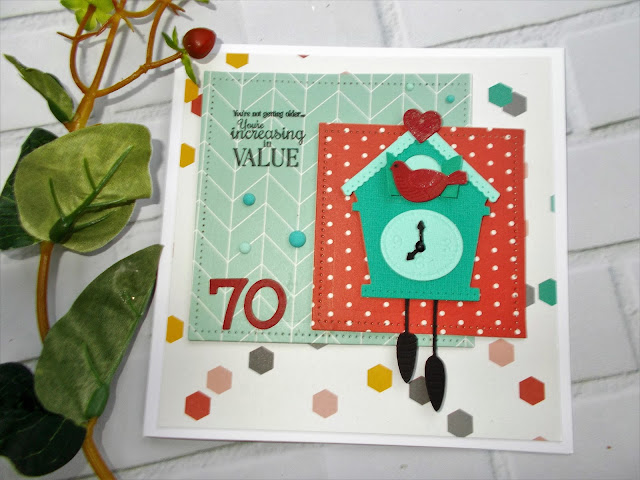
A simple little card today, I was asked to make a birthday card for a 'special' birthday, and came up with this, using this adorable little cuckoo clock die that was a small die of the month from Spellbinders.......the sentiment is from the Special Birthday Sentiments stamp set which I thought was pretty appropriate. I set the hands of the little clock to 7. 00 p.m and added some wink of stella clear glitter to the heart and bird. The aqua paper and the spotty red paper were cut using the pierced squares die set. The 70 numbers were cut using the Count the Stars set by Debi Adams. Find all the dies and stamps here


Sunday 29 October 2017
Cuckoo Clock - Spellblogger post for Spellbinders
Labels:
Spellbinders
Friday 27 October 2017
Blended Backgrounds for Daring Cardmakers
This week, the challenge is Blended Backgrounds - right up my street, I love my distress inks! I came up with two cards, and couldn't decide which one to use, so here they both are.......
This first one uses the broad stripe card cover die by MFT, and some cute elephants, also by MFT (bought to make Molly her first birthday card which is coming up in November)
For the second one, I used a wave stencil to layer the colours into a random rainbow effect. The large HAPPY is a die and stamp I bought at a craft fair in Paris when Kath and I went on our adventure there earlier this year
Be sure to pop over to Daring Cardmakers to see what the design team have come up with this week (a talented bunch, every week I am left shaking my head in awe and thinking 'now why didn't I think of that?......)

This first one uses the broad stripe card cover die by MFT, and some cute elephants, also by MFT (bought to make Molly her first birthday card which is coming up in November)
For the second one, I used a wave stencil to layer the colours into a random rainbow effect. The large HAPPY is a die and stamp I bought at a craft fair in Paris when Kath and I went on our adventure there earlier this year
Friday 20 October 2017
City or Country? for Daring Cardmakers
This week on the Daring Cardmakers challenge blog, Miri asks the question City or Country? I think you can tell at a glance which one I favour.........
For this card I pulled out my Cricut to cut the city skyline, then went a bit crazy with the distress inks. I wanted to try and get the yellow sodium light you get in the night sky over a city. I flicked water over the background to make it look like a starry sky - those larger drops make it look as if there are two moons in the sky!
So City or Country. Which are you? For someone who grew up in a small Welsh town, in a manse perched up on a hillside, I have evolved into a city lover. I probably have a mild anxiety attack if I am more than a mile away from M & S, and given the choice of a weekend away, would dream of Florence, Barcelona, Paris...........mind you, the thought of a weekend away in one of those luxurious country house hotels, with roaring log fires, afternoon tea and comfortable beds sounds quite appealing as well (as long as I am not expected to don hiking boots to tramp for miles along a bleak moor). Paradoxically, one of my favourite breaks is in the Lake District, where one of my best friends owns a cottage. I love going there, and appreciate the beauty of the scenery. Maybe the child from that Welsh hillside has not changed so much after all.............
Thursday 19 October 2017
Mistletoe magic - Spellblogger for Spellbinders
When I saw this Mistletoe Card Front die from Spellbinders, I just had to get it - the design is one that can be used year round for pretty cards, not just for Christmas. It's a great size, the border is 5" x 7", the insert is 4.50" x 6.50". This first card is one of the prettiest I made, but is also the one that was impossible to photograph well, a simple inked background (Simon says stamp Sea Glass ink), and a white embossed vellum band
For this next card, I chopped it up a bit, and just cut elements of the design, cut out of green glitter paper. The 'berries' are clear Nuvo drops, which took on the colour of the card. The sentiment is from the Ho Ho Ho sentiment set
and another one, made with the same die cut, but this time, the berries are white enamel accents
Then I found some gold glitter card, and put that onto a white card base, adding some copper liquid pearl berries.......
This next one was an experiment, but I rather like it, I stuck the die cut onto a white card, then inked over the whole thing with distress inks. The berries this time are Platinum liquid pearls......I thought this would make a nice birthday card for someone....
and my last experiment was to ink the die cut with Autumn colours before putting it onto a kraft card base. This time I added some sequins for a bit of sparkle. Which card do you like best?
I'll be back tomorrow with my Daring Cardmaker card - these weeks seem to be whizzing by, and the mornings are a bit dark and dreary these days as well. Time to get a couple of good books and snuggle down on the couch I think
Labels:
Spellbinders
Monday 16 October 2017
and the winner is................
One last shout out for the delightful Braided Grace Square I have been showcasing for the past week - I found some left over die cuts on my desk and made this Christmas card in about five minutes! The box is filling up nicely..... the holly was cut from the Jolly Holly die set from Spellbinders...
On to the winner - drawn randomly using a random list generator
SANDRA H
Congratulations Sandra. Email me with your address, and your dies will be on their way.
Thanks to everyone who took part, if you are disappointed, but fired up with enthusiasm for the die, you can find the Braided Grace Square HERE
Milo dived into my craft den as soon as he arrived, and emerged with these Christmas cards he had made for his friends - a pop up sweater card. Now this little eight year old came up with the idea, hand drew the sweater, cut it out, invented the pop up idea with no input from me at all. I think that's remarkably creative for a little guy, do you? The only input I had was to suggest a punched snowflake for the front of the sweater. Well done Milo, proud of you
Friday 13 October 2017
Spellblogger Giveaway - day five
Today, I took the braided lace die, but instead of using the outline die to cut it out, I trimmed the surrounding card into a square, and mounted it onto a kraft card base - surprising how different it looks doing it this way!
I added some acorns and leaves cut with the Woodland Acorns Die set - look at the detail on those little leaves. This set is on clearance, so hurry over there........ I cut in white, the leaves were coloured with disress inks, and the acorns with ProMarkers and given a coat of glossy accents
The sentiment from the Special Birthday Sentiments stamp set just about fitted onto the little shape, stamped in momento cocoa ink
I hope you've enjoyed all the ideas this week, I will be drawing a random winner tomorrow, so be sure to pop by and see if it's you... x
Labels:
Spellbinders
Thursday 12 October 2017
Spellblogger Giveaway - day four
Day four of my giveaway for this lovely set. If you haven't done so, go HERE to leave your name to be in with a chance of winning this lovely set, the Braided Lace Square by Becca Feeken
I rather like pink and black together and I think it works well on this card......
For this card, I cut the braided shape without the frame directly into the centre of a pink base card. The black shapes were cut from fun foam
I added a pink panel onto the black foam, offsetting it by a tiny bit, so you just get a hint of the black as a shadow. This was added to the base card, the foam gave it dimension
and this next photo shows how delicate and lacy the see through panel looks on the completed card - you could add a different contrast colour to the back panel of the card, I tried that, but it detracted from the lacy effect, so I left it as shown........
Labels:
Spellbinders
Wednesday 11 October 2017
Spellblogger giveaway - day three
In both instances, I made a shaped card. Easy to do if you shift the cutting edge of the die up by a fraction when passing through your machine, those top edges stay uncut and hold the card together. For this navy card, the card base was cut in navy, then a white layer added. A glittered snowflake from the gorgeous Create a Flake six die set, topped with a word from the Ho Ho Ho Die D-lites set
A different look for this next one - I didn't use a solid background, but cut the card into a lacy frame. More snowflakes from the above set, but this time, instead of glitter, I pressed them into a Versamark pad, and covered them with WOW platinum embossing powder - I love the fact that the embossing detail on the snowflakes is so detailed, that it shows even when coated with three layers of embossing powder! The JOY word is also from the HoHoHo set.....
This shot shows how the back of the card is lacy as well as the front, a really delicate and pretty effect.......
Here's the set one of you will win......
Back to the crafty desk now, to make another card to show you tomorrow......
To enter the giveaway to win this set, go HERE to leave your name. Good luck
Labels:
Spellbinders
Tuesday 10 October 2017
More Braided Grace - and don't forget the giveaway
Here is my second card made with the Becca Feekan die shown yesterday. To enter your name for the giveaway of this die, go HERE to make a comment
I went for Christmas today........
This one is quite simple - just the gorgeous shapes cut in white, but they really pop against the red base card. I used the word JOY from the Die D-Lites set Ho Ho Ho and the flower (which looks a bit like a poinsettia) was cut with a flower from the Month 7 Die of the Month Club. Did you know that Spellbinders have monthly clubs? You can choose between a monthly card kit packed with all sorts of goodies, the large die of the month club, etc.
Here's a reminder of the die I am using this week, and giving away to one of you. Click on the link at the top of this post to leave your name for the giveaway
I'll be back tomorrow with my next card, see you then x
Labels:
Spellbinders
Monday 9 October 2017
Spellbinder Giveaway
Over the next few days I will be posting cards made with the beautiful set by Spellbinders called Braided Grace Square designed by Becca Feeken. I have one of these die sets to give away to one of you - all you have to do is comment on this post, and look at all the samples I am going to show this week. I will draw a winner on Saturday, 14th October and will mail worldwide, so you can enter wherever you are.....
Here's my first card, You can see that I cut the pretty shape out twice, and rotated it to give a layered look. The patterned brown detail in the center is a piece of patterned acetate (one of those things that looks better in real life. I hand cut the banner, and added a die cut sentiment from the Sentiments Three set
Be sure to pop by tomorrow to see the next card I created, and don't forget to leave a comment to be in with a chance of winning.....x
Here are the die cut shapes - I cut the frame separately, but you will see from my examples this week that you can produce masses of different looks just from this one set......in my hurry to grab a photo I forgot to add the lovely embossing detail, the iconic mark of a Spellbinders die, but you will see it on the cards.....
Be sure to pop by tomorrow to see the next card I created, and don't forget to leave a comment to be in with a chance of winning.....x
Labels:
Spellbinders
Tuesday 3 October 2017
Becoming a house builder - for Spellbinders/Spellbloggers
I had such fun making these little houses - I wanted to make them as Christmas houses, so added snow to the roof and gardens......find the Build a House die HERE
I used small dies from other die sets for some accents - the circle on this next house is the dial from the phone in the HELLO die set, I thought it made an interesting architectural feature!
For this next house, I used corrugated card for the roof, dry brushed with white acrylic paint and given a scattering of flower soft white 'snow. The wreath on the door is a flower center from the month 7 die of the month club set (I punched a hole in the middle of the die cut to make a wreath, and added red perfect pearls berries). The brick pattern on the walls was inked through a stencil
This next one had a brick stencil inked onto the walls, the roof was given some texture with an old embossing folder I had. The little banner was cut from the Flight 2 die set......It was fun altering the details so that the houses looked different - for instance, I drew a line down the center of the door in this one, to turn it into an imposing double door entrance
You can leave one side of the roof free, so that it can be opened to take a LED tealight, but I found this impossible to photograph, you will get the idea if you watch Yana's video (link below)
I had a lot of inspiration from watching a video made by Yana Smakula with her version of these houses - watch it HERE I especially liked her idea of cutting windows and doors out of fun foam to give dimension, and using vellum behind the windows, which I did on all my houses
The ridiculous thing was that I found myself being quite obsessive about the details of these houses, the colours had to complement each other, and the picket fences all had to be white (hey, I'm the CEO of this homeowners association, I make the rules......). I also found myself worrying that if I put the fences across the fronts of the houses, the little people living in there wouldn't be able to get out of their gardens to take the little dog for a walk - I know, nuts!
Labels:
Spellbinders
Subscribe to:
Posts (Atom)


