


I've been having a go at making my own texture paste, and it works pretty well, and the results are pretty much the same as using the expensive bought stuff...

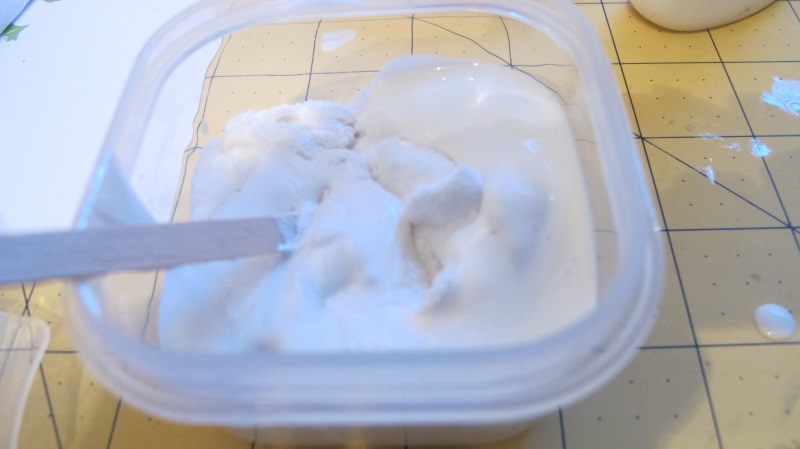
You need bicarbonate of soda (or talcum powder), white PVA glue (any inexpensive stuff you can find will do) and white acrylic paint, measuring spoons, cup measure, an airtight small pot and a craft stick

Measure out 1/4 cup of bicarbonate of soda into your container. Add 2 tablespoons of white paint, and 1 -2 tablespoons of PVA glue, stir until it's a nice creamy consistency. Add up to another tablespoon of glue if it seems a bit thick

Cover with a lid, make sure it's tightly shut. It keeps as well as the shop bought stuff. Use with stencils, make sure you wash your stencils right away. Sprinkle the paste with glitter if wanted while it is still wet. You can also ink it once it's dry

Here's a couple more, for this starry one, I sprinkled the stars with glitter when wet.....

and I love this stencil by Imagination Crafts here in the UK

and here's why you haven't seen me for a few days. The new floor has been laid throughout the ground floor of the house, which meant all the furniture had to be piled up and shifted from room to room....

thank goodness the Orangery took a lot of the overflow....

but my carefully organised and tidy little studio had to be stripped bare....

The whole process took four days - four days of misery actually. We had nowhere to sit, nowhere to watch TV, the computer was unhooked, the phone was buried somewhere under a pile of stuff....
But it was worth it! You can see the start of the new floor in the studio shot above, and the rooms are put together again, the half inch of dust from the cutting of the wood has been wiped away, we waved a grateful goodbye to our latest workmen (from Albania this time, to add to the Hungarian, Pole, Italian etc etc we have collected over the past few weeks!)
It's beginning to feel like home at last. See you tomorrow x

Looking good.....
ReplyDeleteThanks for the tutorial on the paste. I've used spackle, but this seems like it will work better.
ReplyDeleteGlad your house is coming along so well. It's lovely.
This comment has been removed by the author.
ReplyDeleteYour house is looking lovely. Thanks for the paste tip.
DeleteThanks for posting this "recipe" for the texture paste. Your cards are just lovely. Can't wait to give it a try myself.
ReplyDeleteLooks like those floors sure were worth it, looks great and you'll enjoy them for years. Thanks for sharing all this with us.
Never thought of making my own paste... hmmm. Nice cards; congrats on finishing up on your house and enjoy!
ReplyDeleteLooking great Enfys, I've seen lots of texture paste recipes..this one looks good and your cards have turned out beautifully x
ReplyDeleteLooking great Enfys, I've seen lots of texture paste recipes..this one looks good and your cards have turned out beautifully x
ReplyDeleteSaw this on FB, looks like a great idea. Glad you are getting sorted at home x
ReplyDeleteThe floors look beautiful, and I hope that you can now start to enjoy living in your new home! thank you for the recipe for the embossing paste; I will have to give it a try, as I have never been "brave" enough to buy and try the "real" kind!
ReplyDeleteBeautiful cards!!! Thanks for the texture paste recipe, I am too timid to try it though.
ReplyDeleteYour wood floors look wonderful! Sorry you had to dismantle your crafting space!!!
Hi Enfys, been following you for ages but not commenting. Decided it's time to change that! I love what you do and frequently find inspiration on your blog. Thanks for sharing the texture paste recipe, I possibly won't make it because I have so much of the bought stuff to get through first and I'm on a using up my stash kick! The cards you've made with it look fabulous. Your floors look beautiful, hope you get the furniture back soon to enjoy it xx
ReplyDeleteYour home is coming along beautifully. I had to look up what an Orangery is. Now I know!
ReplyDeleteI have a Sun Room. Thank you for the paste recipe.
Love those cards! Love, love the stencil with the forest and the deer! Your home is looking lovely. Looks as though you have gone through a total remodel. I know from experience how hard that can be. It's well worth it in the end and yours is looking gorgeous.
ReplyDeletethanks so much for sharing, will definitely give this a try
ReplyDeleteBeautiful cards, thanks for sharing the paste idea; one day I will step out of my comfort zone and venture into other areas of crafting. Thanks for sharing the transformation of your beautiful home.
ReplyDeleteGood that things are coming together. Thanks for the tutorial. As soon as I get some more white paint, I'll have to give it a go as I've been wanting to try for ages.
ReplyDeleteThanks for the recipe Enfys, so cool! Sounds like havoc has been rocking your floors but as you say it looks gorgeous and that's it for a lifetime hopefully lol.
ReplyDeleteJust thought I would comment and say coolNugenix theme, did you create it for yourself? Really looks superb.I believe one of your commercials caused my web browser to resize, you may well want to put that on QuickList.Thank you, great post! Just the stuff I needed to get.Thank you for the useful post.For more ==== >>>>>> http://www.healthsupreviews.com/nugenix/
ReplyDelete