Home Tutorials About Me Video's Cards for Sale

Monday, 2 November 2015

Homemade Texture Paste...

I've been having a go at making my own texture paste, and it works pretty well, and the results are pretty much the same as using the expensive bought stuff...


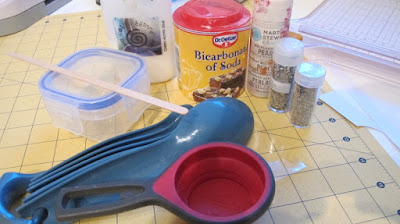
You need bicarbonate of soda (or talcum powder), white PVA glue (any inexpensive stuff you can find will do) and white acrylic paint, measuring spoons, cup measure, an airtight small pot and a craft stick


Measure out 1/4 cup of bicarbonate of soda into your container. Add 2 tablespoons of white paint, and 1 -2 tablespoons of PVA glue, stir until it's a nice creamy consistency. Add up to another tablespoon of glue if it seems a bit thick


Cover with a lid, make sure it's tightly shut. It keeps as well as the shop bought stuff. Use with stencils, make sure you wash your stencils right away. Sprinkle the paste with glitter if wanted while it is still wet. You can also ink it once it's dry 


Here's a couple more, for this starry one, I sprinkled the stars with glitter when wet.....


and I love this stencil by Imagination Crafts here in the UK


and here's why you haven't seen me for a few days. The new floor has been laid throughout the ground floor of the house, which meant all the furniture had to be piled up and shifted from room to room....


thank goodness the Orangery took a lot of the overflow....


but my carefully organised and tidy little studio had to be stripped bare....


The whole process took four days - four days of misery actually. We had nowhere to sit, nowhere to watch TV, the computer was unhooked, the phone was buried somewhere under a pile of stuff....

But it was worth it! You can see the start of the new floor in the studio shot above, and the rooms are put together again, the half inch of dust from the cutting of the wood has been wiped away, we waved a grateful goodbye to our latest workmen (from Albania this time, to add to the Hungarian, Pole, Italian etc etc we have collected over the past few weeks!)

It's beginning to feel like home at last. See you tomorrow x 

Wednesday, 21 October 2015

Golden Wedding Invites.....

So someone on the Fiskarettes UK Facebook page asked for ideas for simple invitations she could make for her upcoming Golden Wedding celebrations. Here's what I came up with for her - they are all quite simple and easy to mass produce.......I kept them flat as well, so that postage costs would be less


and after all my posts about the kitchen, the least I can do is to show you a work in progress......


So today has been a 'day off' - no workmen, no music, no endless tea and coffee making. Time to recharge the batteries and just FLOP!

Marilyn contacted me to say she has been having problems leaving comments on here. Has anyone else had a problem? Let me know (not that I have a clue what I can do about it mind you, but someone in Googleland will know.....)

See you tomorrow x

Tuesday, 20 October 2015

Kitchens and superbugs.....

I don't think I have ever had such a prolonged leave of absence from my blog - thanks so much to all of you who have emailed me to see if everything is okay.
I was struck by a superbug - the mother and father of all colds, it went away, came back, went away again......in the meantime, the house was freezing, with workmen here, doors and windows wide open, I couldn't even creep away to my bed to shiver in comfort - the plumber was fitting the new shower. Then every few minutes someone has a question - how do you want this? where shall we put this? What shall we do about this?.........

Oh, it has been miserable!

However, I am now much better, and the house is oh-so-slowly taking shape. I promise to take photos soon. I must have made about 300 mugs of tea and coffee for various guys working around the house, listened to non-stop music of various genres all day every day - my heart sinks when the heavy metal guy walks in! But all the people we have had helping us renovate the place have been really great, we struck lucky...I have listened to tales of woe about errant girlfriends, dished out sympathy about ailing parents, offered doughnuts and aspirin, and generally gone into mother-hen overdrive.  

So here's a couple of quick cards made with Fiskars stamps - they are the sort that fit on the continuous stamping wheel, but (shhh, you don't have to have that, you can fit them on a block). This first one is a stamp called Choo Choo...I used little buttons for the wheels


and I used this floral stamp to make panels for a gatefold card....


with a little pocket on the inside for a gift card....


and I made a little tab to hold the front closed


It's nice to be back!

Monday, 5 October 2015

Halloween Pumpkins

Here's a little video I made for the Fiskarettes Facebook page.........Pumpkin Pie anyone?


The new kitchen is coming along - what a job! It has been like the United Nations here - tiler from Hungary, Flooring guy from Albania, electrics from Italy, plumber from France! But they are all great guys and doing a super job......


So the kitchen floor has to be lifted. 'We can do that' we thought. 'Save some money' we thought......... So the top layer of laminate wood was ripped up. Then a layer of vinyl tiles that had been laid underneath. That uncovered another layer of vinyl tiles, which we ripped up - I was getting very bored with it all by this time. Finally, we uncovered ceramic tiles which have been laid for so long that luckily the adhesive has all dried up and they are fairly easy to get up. So four layers of flooring, all on top of each other - it's a wonder the floor didn't meet the ceiling!

Right, I must get back on my aching knees now, and carry on with those pesky tiles.... 

Thursday, 24 September 2015

and the winner is......


I had a little session of mass producing some birds cut with my Fuse - I cut out some in black, white, red and teal (which looks blue in the photos) and then set about chopping them up.........


and I couldn't resist putting one in a teal frame that I found in Poundland for my crafty den.............


and the latest on the home front is that this kitchen is being ripped out today - looks okay as it is doesn't it? That is until you look closely and see that the microwave is plugged into an extension cable and the doors fall off every time you open one. 


So as soon as we get one room straight, it promptly gets messy again as stuff from another room on the 'work in progress' list gets decanted into it.....but it's taking shape, and we are loving living here....

The winner of the metallic markers, drawn randomly is:

LINDA COLE

Congrats Linda, email me with your details and they will be on their way to you

Tuesday, 15 September 2015

Getting Organized....

So I had a session organizing my embossing folders - firstly I punched a load of tags....


and punched a hole in the top - the tag maker makes short work of this...


then I pulled out my embossing folders and embossed each tag - I left them in the folder until I was finished....


then I labelled each tag on the back with a number and the size of the folder. I didn't name them as it's pretty self explanatory what each one is just by looking at it! Then I put a sticky dot on each embossing folder with a corresponding number, so in future I will keep the folders in their number order....


and just flip through the tags which are now on a ring, to see which one I want to work with, and pull out the folder...


This exercise made me feel like superwoman! I was a bit bemused that this house move has somehow altered me, and that in future I will be able to lay my hands instantly on everything, not only in my den, but throughout the house. Did I get a visit from some housework fairy in the dead of night to pass on some super powers to me? Will life ever be the same again?..........the superwoman euphoria lasted for at least a day.......

Then my camera battery needed charging. It took me three days to find the charger - it eventually came to light in a box of light bulbs.  We bought the camera in the USA, so I have to use an adapter plug could I find it? I turned the whole house upside down looking for one, we must have a dozen of the things. Eventually I found it - in a box of random first aid stuff. 

So I haven't become all logical and organized after all - it's quite a relief really, I quite like the feeling of pleasure I get when I discover something in an unlikely place. 

See you tomorrow x 

Thursday, 10 September 2015

Chickens - and a giveaway....

First of all, I must say sorry that I'm late with this post - no excuse really, just life getting in the way.

Sharing with you some fun chickens I made for a card....I started off by cutting out some circles....


Then punched some flowers from the same pattern paper....


I chopped a bit off the circle, and added just three of the flower petals to one end.....


Then I punched some red flowers.....


and used three petals again to the straight edge. I cut a tiny triangle of orange for the beak....


and added a black dot for the eye, and a punched heart from a different pattern paper for the wing......


I die cut some Lawn Fawn stitched curves for hills.......


and gave my birds some legs. Now they look like chickens - sort of!


On to the promised giveaway, here's a treat for one of you, just in time for all the Christmas cards you are planning, six metallic markers from Letraset to add a bit of shine and sparkle to your projects


All you have to do is leave your name in the comments under this post, and I will draw a winner randomly next Thursday. Good luck!

Friday, 4 September 2015

My 'moon' projects

I promised to show how I made my little 'wall art'. I started with one of the new Fiskars thick punches - these will cut through all sorts of material, chipboard, milk bottles, shrink plastic, thin balsa wood, and lots more

I had some stiff self adhesive stencil vinyl so I punched a circle.....


Stuck it to a card and started sponging with distress inks......


until I was happy with the result.....


then I peeled away the vinyl to reveal the moon


added some streaks of pale grey for a bit of shading across the circle of the moon


then stamped an image from the Inkadinkadoo Meadow clear stamp set...


and a sentiment by Hero Arts. The whole panel was mounted onto a white card


and I liked the effect so much, I reproduced it in different colours for my craft room


Have a great weekend. I will be back with a giveaway on Sunday, so be sure to drop by then x

Tuesday, 1 September 2015

Getting there....

At last! A more or less fully functional space I can call my own. The flooring will be changed to wood eventually, and the window will have a roman blind - I am searching for suitable fabric. The blind will be more of a design statement than a necessity, as the room overlooks the garden.  I wanted to avoid lots of clutter, I didn't want kitchen type wall units. My vision was everything out of sight, but as I progressed with the unpacking it became obvious that it would be impossible to hide everything away, and impractical as well - I would be forever reaching out for stuff I use all the time and then forgetting to put them back.........

I have three drawer, each with five drawers units under or beside the desk, holding all my stuff like ink pads, misti, embossing powders and heat gun, blank cards, white, black and kraft cardstock (the ones I use most often, and for stamping), one drawer holds glitters, metallic paste, crackle paint etc, another holds my stencils and texture pastes. Then there is a drawer of stickles and liquid pearls, and one with new replacement adhesives, craft blades, glue dots, xyron refills etc. In other words, pretty much everything I need regularly is close to hand. My Pampered Chef turntable thing is the one I have used for years now,  with pencils, bone folder, scissors, glue pens etc close to hand. I also have a little desk tidy where I keep the memento and versafine black inks that I use for sentiments, tiny bottles of glossy accents, and small bottle of tombow mono multi medium glue, and cosmic shimmer glue - all the stuff I use daily. My distress inks are in the storage unit you can see by the lamp, and I keep the carousel with the blending tools next to it.........The black drawer unit which I will replace when I can find something similar in a more pleasing colour, holds all my embossing folders. My Promarkers live in a Copic bag under the desk!!!  


So the 'Bygel' bars came out again, in these I have stuff like red double sided tape, bakers twines, paint daubers and brushes. The Alex large chest holds my Fuse, and all the dies are in the drawers below. I also have a drawer full of wood mounted sentiment stamps that I have collected over the years and don't want to go to the bother of unmounting them. Another drawer holds all my watercolour stuff - paints, paper etc, and the bottom drawer holds Cricut mats and vinyls. Christmas stamps fill another drawer

The Kallax units hold various other stuff - one cupboard has fabric, sewing cottons, bobbins etc, a drawer holds buttons and brads, another has all my gems, split into colour families and kept in clear plastic document holders from Poundland. A lot of this unit is taken up storing all my Fiskars punches. You can see the paper storage in the far corner 


and another Bygel bar on the other wall - it's only a small room, so I wanted to keep this wall free from units etc, but put this up to hold all my new thick materials punches that are due to be released in the UK this month. I like the way they look, and combined with the teal of the units, it seems that my colour scheme for the room is teal and orange! Above this 'punch bar', put up after I took this photo, is a shelf with three white containers holding all my clear and unmounted stamps that I keep in plastic envelopes from Poundland. You can just see this shelf to the right of the first photo. It looks high, but is quite reachable for me as I am tall.........


So I made a little piece of wall art to link it up, I'll share how I made it tomorrow, but the Ikea frame looks good against the taupe wall


Not close up enough for you to read without enlarging, but the wording says 

Note to self              Create                   this makes me happy


I hope you enjoyed the interim tour around my new space - I am loving it!