A bit of a project for today - whilst I was tidying up my crafty stuff, I found all my alcohol inks and distress inks, I wondered where they had got to. So I decided to have a play.
First of all I cut a couple of flower stems from my Cindy Lou cartridge at 5", I cut a couple out but decided to go with the droopy headed one...........
 then I stamped a Hero Arts script stamp roughly onto a scalloped 6 x 6 white card base
 I used a krylon spray repositionable adhesive to stick the flower onto the card
then started dabbing away with Adirondack acrylic paint dabbers in copper and gold

I covered the whole thing quite liberally

then peeled away the die cut. The flower shape looked too white, so I used my sponge applicator to dab on some antique linen distress ink

I took a large white Prima flower and dabbed away at that as well with my distress inks, then folded it in half with a glue dot and stuck it on. The sentiment is one I brought out with me from the UK - I think it is by Kanban, that had a liberal helping of distress ink as well
Here's the finished card.....................

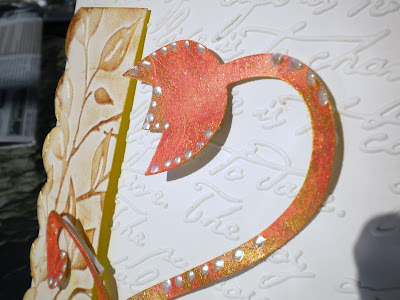
 and I couldn't let that gorgeously coloured mask go to waste, so I used it on this second card. I used an ivory card base for this one. The script embossing folder is a big one by Fiskars. I embossed the little strip on the side with a cuttlebug folder, swiped with a Perfect medium pad, then brushed with copper Perfect Pearls
I doodled a few dots here and there with liquid pearls, they looked a bit white, so I brushed those with the copper Perfect Pearls as well, when they were almost dry, but still a bit tacky. I like the way the acryclic paint curled the die cut up a little, so it looks dimensional. I stuck it on with silicone glue - I use Pinflair from the UK, I don't know if you can get it in the USA, but if you find it, clear the shelves, it's fantastic stuff. You can use silicone sealant available from Lowes or Home Depot - you put it on in blobs, and the blobs dry hard and raised, unlike ordinary glue that flattens when dry. It's useful for skinny little pieces as well, where a foam pad would show.

For lots of ideas on how to use Ranger products, go to their website. You can get loads of ideas from Tim Holtz as well
 I keep meaning to take step by step photos of bigger projects, or interesting techniques, if you have found this useful let me know, and I'll try to remember to keep my camera handy - it's a lot easier than taking a video where I have to edit the floor, ceiling and the sound of the telephone ringing, out of the frame!
See you tomorrow - I am making some cards with an exciting new find from Michaels dollar bin.


I love the step by step. Need to fish out my inks and give it a try.
ReplyDeleteThanks for the inspiration Enfys. Warm wishes
I love both of your cards. Great tutorial, keep them coming. I'll have to try this. Shari (cricutrookie)
ReplyDeleteGorgeous cards.
ReplyDeleteReally lovely projects Enfys - and I agree it would have been a waste not to use your mask - beautiful! Cheers Claire x
ReplyDeleteWow, Enfys, this is so great. I think that I don't understand all, but your card is fantastic.
ReplyDeleteHugs
Melodie
Ohhh wowww Enfys,What a wonderful cards.
ReplyDeleteHugs Riet.x
Hi there, love this tutorial, got to admit I don't have a Cricut but any mask would do, love your cards! thanks for sharing :0) xx
ReplyDeletelove these cards. great idea! thanks.
ReplyDeleteWarm and fun!
ReplyDeleteWhat a fabulous set of cards!! I just love all the details about the steps and for once I own all the stuff you used (except for Cindy Loo, but I can adapt! lol). You are such an inspiration, En. Love seeing your work every day....
ReplyDeleteSue B
Enfys, I think this is fantastic! I love to see the things you do with the alcohol inks. I will definitely try this procedure. I appreciate all of your inspiration. Hugs, dj
ReplyDeleteI love this project, should say 2 cards. Thanks so much for sharing, and I for one love step by step instructions.
ReplyDeleteDonna C.
goCricutgo
Enfys, Love both of your cards...I like how you but the prima on the first one....
ReplyDeleteVery pretty! I haven't done anything with the perfect pearls beyond the first try. So I'll have to checkout Tim's and Rangers pages. Thanks for sharing.
ReplyDeleteI need to just sit down and PLAY with the alcohol inks and some other items - I never do that - thanks for inspiring me!
ReplyDeletejackie
WOW!!! These are just awesome!! Love the step by step. :)
ReplyDeleteEnfys you are just so darn clever! You have given me inspiration - I'm thinking on a larger scale for this same technique on a canvass to put up my living room wall.
ReplyDeletehugs, MelodyR aka Ry&MysMom
Hello from Port St. Lucie. I haven't bought any inks as when they first came out I didn't understand what to do them. Now I am headed to the store as these cards are amazing. Thanks for sharing. Joan
ReplyDeleteThis is just lovely Enfys! Thanks! I'd like to see the step by step, but your photos pretty much covered it. Did you use a special paper for this card or regular cardstock? Can't wait to see what you Michael's dollar bin project is. Pam
ReplyDeleteLove both of the cards. - Janice W.
ReplyDeleteThe finished product is beautiful.
ReplyDeleteVery nice and really like the way they came out, Both of them!! TFS!!
ReplyDeleteRexann
Great photo tutorial x
ReplyDeleteWhy don't you pop along to our craft blog www.fiskarettes.co.uk We have competitions, challenges, charity events and even a class at the NEC (Birmingham with Shimelle lane - but you need to book x)You can inspire or be inspired :)
Two gorgeous cards, En. I love the painted flower. You've certainly used every scrap up on these beauties.
ReplyDeleteHugs Lisax
Both cards are beautifu. I always learn so much from you. Your posts and pictures are so inspirational.
ReplyDeleteBeautiful card. Thanks for the tutorial. Keep them coming, I need all the help I can get.
ReplyDeleteOhhhhh sista friend!
ReplyDeleteYou are such an inspiration!
hug you, TR
Love these cards and technique. I find the project pictures very helpful as I am very much a visual learner and when I can see it, I can learn it so much easier. I do like videos, but I know they must be a lot of work and can learn from the pictorial tutorial as well.
ReplyDeleteThanks for all the inspiration and guidance!
Enfys, I just love both these cards!!! I'll definitely have to try them!
ReplyDeleteThis is gorgeous!!! both cards are fabulous.. and I would luv the step by step instructions they ae so helpful......luv your awesone projects and cards!!!!
ReplyDeleteLove these cards, both are gorgeous and that is a fascinating technique! ~Diane
ReplyDeleteThese both look as gorgeous as each other, the effect of the inks is really striking. Love the step by step guide.
ReplyDeleteKim xXx
Beautiful cards, great inspiration to use my inks!
ReplyDeleteI love your technique I think the left over one is my favorite.
ReplyDeleteAbsolutely stunning! What a great idea...I'm inspired to try something similar soon...thanks for sharing!
ReplyDeleteThanks for the step by step photos. It's helpful to understand some of the terminology used.
ReplyDeleteI just absolutely love this!
ReplyDeleteJust love your site---your instructions are always so clear. Beautiful cards----Nancy
ReplyDeleteMore beautiful cards! I will be trying this:) TFS
ReplyDeleteAwesome card. So pretty. I'll try with regular ink but love your concept.
ReplyDelete