Thank you all for the lovely comments on this project...........
I ha given the magazine step by step photos, but they didn't use them so thought for those of you who like visual steps I would put them here. The gorgeous hessian ribbon is from The Ribbon Girl
First, I used a dinner plate and a side plate to draw two circles onto cardboard and cut them out, then stuck them firmly together. You can cover the base with ribbon if you want at this stage......
Next, cut about 90 3 1/2" squares from old sheet music and ink the edges...
The red line shows where you would apply double sided tape, the red cross will be the point of the cone....
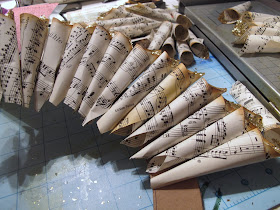
Roll it like this, the tape will keep it secure. Add glue with a pen to the point of the cone and sprinkle with gold glitter....
Start adding your cones with a hot glue gun to the base, laying them side by side. You will see that the bottom edge looks uneven - when I had finished sticking them down, I simply used a scissors to trim the edges so that they finished neatly at the inner edge of the circle. I then added a second layer of cones over the first layer which gives it a full and luxurious appearance
I hope this helps. I am sorry that I sent so many of you on a wild goose chase to leave comments over at Papercraft Inspirations - they have a new website, and I think their commenting programme needs a check! But once again, thanks to so many of you who left comments here, on Facebook and by email, it more than made up for the burnt fingers
I've also had a few emails asking about the stamp and sentiment on the snowman card I posted a few days ago. The stamp is an old one by Sparkle 'N Sprinkle and the sentiment is a digi download from Pink Petticoat
See you tomorrow with a giveaway x


Thank you for the 'step-by-step' Enfys...this is such a fabulous project.
ReplyDeleteToni xx
Thanks so much - I love this project
ReplyDeleteThat is just lovely! That bit of sparkle on the tips is perfect. Thanks for the tutorial!
ReplyDeleteGreat step by step tutorial Enfys - thank you. Pat x
ReplyDeleteMany thanks Enfys, a fabulous project that I will create for next year (Ive not got time this year) xxx
ReplyDeleteThanks Enfys!
ReplyDeleteIt is a lovely wreath ! Thanks for sharing the instructions! I might have to try that ! I am enjoying my Candi. Thank you !!
ReplyDeleteAnn N.
Thanks for the second look at this project. You are one creative lady! It's just gorgeous.
ReplyDeleteEnfys this is simply beautiful
ReplyDeleteI love the wreath you created with the sheet music! It is just
ReplyDeletebeautiful!!!!
Hugs,
Maryellen
Love the wreath! Wow 90 pieces! I'll bet it took forever to finish! But very pretty. TFS Hugs, Jess
ReplyDeleteLoved this project. Thanks for the step by step
ReplyDeleteThanks so much for the step by step instructions. Now all I have to do is take the first step of getting started on making one of these. It is beautiful!
ReplyDeleteI did this last year Enfys and kept it safe and actually remembered to get it out this year! http://kamilicrafts.wordpress.com/2012/12/02/vintage-christmas-wreath/
ReplyDeleteHave a very happy Christmas Kim
Ove informacije vrijede svačije pažnje. Kad mogu
ReplyDeletesaznaj više?