Wednesday, 30 March 2011

More of Thomas

Here's another card Imade with that lovely little boy stamp from Sugar Nellie. Coloured quite differently this time, but he still looks angelic..

All he papers are from the DCWV 'guy' stack. I chopped a bit off the right hand edge of the front, and lined the inside of the card with a coordinating paper.
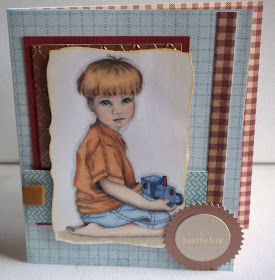
Promarkers used:

Ivory and Blush and dusky pink for skin

Denim blue and powder blue for shorts

Apricot, soft peach and terracotta for shirt

marine blue, sky blue and powder blue for engine

umber, terracotta, cocoa and saffron for hair

Talking of Promarkers, don't forget to go HERE to leave your details for the competition to win 36 yummy colours


As you read this I will probably be winging my way back to the USA. Today has been an exhausting round of cleaning and packing. As I write this, at 1.30am, I have just realised with a sinking heart that the taxi picks us up in five hours! Better go and get some sleep. See you very soon from the other side of the pond

Tuesday, 29 March 2011

Sweet Birthday Wishes..

I found this BIG Woodware acrylic stamp at Olympia, and as I love big images, snapped it up. It doesn't show up very well on the photo, but I stamped the image twice, once onto white card, which I coloured in with Promarkers, and again onto vellum. I just cut the sundae dish out and stuck it on with vellum sticky dots. In real life it really does give the effect of frosted glass.

I added glossy accents to the cherry and the chocolate drop, and some glitter to the sprinkles.
The car saga of Los Angeles goes on - you remember the car we hired to do a days shopping? Spent the whole day hopelessly lost, got towed, spent a fortune to get the car back..........? Well yesterday I got a notification from Alamo who said they had provided details of the hire to ??? and that it would cost me $20 for their admin time. Then today, voila, the mysterious peeps who wanted my details caught up with me, LA parking violations bureau - would I kindly send $88 at once which was my fine. I naively thought that the vast sum paid to the tow company was the end of the matter. I kid you not, we could probably have purchased an old banger for the day for less money than this cost! You can't fight the bureaucrats of course, but it was galling to see the details written in black and white. Parking was allowed on that road until 3 :00 PM. Time of violation? 3: 03 PM.

They must have been sitting in their little tow truck over the road, sniggering as we left the car.....yeah, suckers, we got you!

See you tomorrow

Monday, 28 March 2011

Thomas -

Here's another digi image from Sugar Nellie, this really sweet little boy called Thomas. I used papers from the guy stack by DCWV - the green paper has a lovely geometric shiny pattern on it. The sentiment is by Kanban, I thought he would make a lovely birthday card for a daddy - especially if his child looks as angelic as Thomas

Coloured with promarkers, but I'm afraid I have mislaid the list of colours I used I ran a narrow strip through the cuttlebug using the herringbone folder, and found this wooden button threaded with beads that was simple enough for a guy card You still have plenty of time to leave your name HERE for a chance of winning all three of the brand new Promarker blending sets, and an extra chance for those of you with a blog if you put a link to the contest on there. Open until the 5th April. Good luck.


We are getting ready for the big exodus here, back to the packing.....and cleaning.....and finding lost things, or losing more stuff that I had put in a very very safe place. That's where I found the missing camera by the way, in the very safe place that I had put it so that I would remember where it was....confused? So am I! See you tomorrow

Thursday, 24 March 2011

More of Warren the rabbit.....


Here's a couple of quick cards I made with the totally luscious Warren - he comes all ready printed on the cut circle, needs minimal colouring....what could be easier? Base scalloped card and the rabbit images are from Craftwork Cards

I kept this first one really simple, just added a pinking shears nestability circle, and a bit of colour to the flowers. I airbrushed the circle very lightly with pale blue and green

For this one, I used papers from the DCWV Linen Closet stack - that must be my all time favourite DCWV stack, I just love the soft colours. I found the easter time stamp lurking, it is a really old studio G dollar stamp, and has a little chick underneath the saying, but I just inked the sentiment with a memento pen and stamped onto the rabbit circle....


I can't tell you how busy I have been, replacing work that was lost in the great flood - okay, it was a steady drip, but still destructive. We have had men clambering all over the roof, how on earth can they do that, climb up a ladder with a bucket of mortar in one hand and a cigarette in the other, talking on their phone which is clamped under their chin. Our house is three storey - I couldn't bear to watch, so I made them all a coffee, had to watch it all in reverse then listen to the tale of one of them being carried unconcious into A & E last week after falling off a ladder. So I gave them a biscuit and dashed into the house to see if we were covered on insurance if they tumbled off our roof.
Scroll down for the Promarker giveaway post - you have plenty of time to enter, it's running until the 5th April - don't forget you need to leave your answer on the Letraset site, link in the post below
See you tomorrow if I can find my camera, which seems to have gone missing, I just hope it isn't in the bin bag with the soggy paper..


Tuesday, 22 March 2011

Promarkers up for grabs........

Here's your chance to win all three of the new Promarker blending sets - that's a total of thirty six markers to add to your collection, or to start you off, and it's super-easy to enter
All you have to do is go HERE and leave your answer to this question
How many ProMarker colours are there?
The answer is easy to find on the Letraset website
There's more - all those who provide a link to the competition on their blog will be eligible for another draw to win a blending set of their choice, so you may win twice!
The competition runs until April 5th
Good luck!

Here's a simple little Promarker card - image by Sugar Nellie, base card by Craftwork Cards, sentiment stamp by Great Impressions. I tied raffia around the edge, thought it fitted in nicely with the garden theme


Promarkers used:
dress denim blue and powder blue
apple green and lime green
cinnamon unber and cocoa for the leaves
Warm grey 4 & 5 for hedgehog
I am having such a hard time trying to catch up with all the stuff I had to throw out in a sodden heap, so no time to 'chat' today, hopefully I will be on top of things by tomorrow


Monday, 21 March 2011

Beach Babes

Here's one of two cards I made for Scrappy go Lucky's blog using Art Impressions Beach Babes stamps, available from the store.
I stamped the image direct onto cardstock, then airbrushed around it with yellow for sand, and some sky blue. I stamped the image again onto white card, and coloured the 'babes' in, then cut each one out and stuck it onto the base image with foam pads. I love the sentiment
Happy 29th birthday from your 110 lb friend!


As I coloured them in, these ladies took on a life of their own, and developed distinct personalities. Edna, in the purple really doesn't like Madge in the green swimsuit - Madge goes a lovely shade of brown, whilst Edna just goes reddish. Brenda on the right doesn't really like any of them, she is only there for the beer, and is lost in a little alcohol induced world of her own. None of them like
Aggie in the turquoise, she is the only one without a cocktail glass, they only ask her along because she doesn't drink and will drive them all home when they are smashed. Poor Aggie loves them all, bless her, she thinks she is so lucky to have such glamorous friends.
You can see the other card on Scrappy go Lucky's blog

It's been a whirlwind week, as well as helping out at the Olympia craft show, we did sterling duty as babysitters, which was a joy of course, and saw all the family. Spirits were dampened a little (well, a lot) when we got home last night and found that the dratted leak into my craft cupboard which we thought was fixed has started up again. I had to throw away a whole black sack full of soggy papers and ribbons, and even more annoyingly the water had ruined an almost complete project for a magazine commission. Hey ho, back to the drawing board......

Tomorrow sees the start of a super ProMarker giveaway. Be sure to pop by. See you then


Friday, 18 March 2011

Make and Cake

Well, as always when you are dreading something, the journey to Olympia was a doddle....I was hopping on and off trains with all the aplomb of a Londoner. Why do I always imagine worse case scenarios?
So here's the Papercraft Inspirations stand that was so beautifully done, all pink and white stripes, like a really trendy cafe.....all the buttons, beads etc for the make and takes are in glass sundae dishes, and the ribbons in sweet jars. Very original and pretty.
Here's Jenny Dixon, the editor helping readers with one of the make and takes

and Angela who had designed them all. You can see the big theatre in the background where Dawn Bibby was doing demos throughout the day..

here she is, with a rather dishy guy from QVC


Make and take in progress.....

here are the card designs...


and a pleased customer with her finished card....


and here is Lisa, who is fairly new to cardmaking and has a real talent for it. She instantly altered the make and take to stamp her own style on it....


Here's her card. Good job Lisa


So perhaps today I will at least know what I am doing, and won't have to keep looking up the instructions on how to make each card! If you are going today, be sure to stop by and say hello, and don't forget your cupcake card entry to be in with a chance to win a prize


Thursday, 17 March 2011

Birthday Wishes

Here's the last Sugar Nellie image for a few days. For this one, I cut a label shape (Go-Kreate) in white and ran it through the cuttlebug with the sissix dots folder. Then I cut another label shape in the same size in pink, and cut around that with the next larger sized die to create a frame, which I stuck to the card with foam pads.
I cut the coloured image out, and popped her onto the frame.
The tiny sentiment echoes the shape of the die perfectly, and the flowers were cut using the Posy Patch stamps and dies from Heartfelt Creations (available very soon from Sir Stampalot in the UK)


As you read this I should be safely at Olympia. My kids, knowing how hopeless I am, have given me idiot proof instructions on getting there. There is a general feeling of anxiety/hysteria in the family about the fact that mum is on her own, trying to get from A to B, without the aid of a GPS, a map, or a well trained Sherpa guide to help her navigate the streets of London. I know, I know.....it's quite pathetic really, how did I get this reputation? Oh yes, it may be something to do with my recent adventures in Los Angeles, or the time a friend and I drove for about fifty miles when we were making a 5 minute journey in Orlando.


I will take lots of photos to share with you tomorrow


Wednesday, 16 March 2011

Baby Boy Card

Here's a card made with the Bambino download from Sugar Nellie - isn't he adorable? I suppose it could be a little girl baby, but somehow it looked like a little boy to me. Coloured with Promarkers, and the papers are by Craftwork Cards. The sweet baby and welcome stamps are by Studio G

I used Ivory, blush, sunkissed pink for the skin, and powder blue and denim blue for the hat


We are on babysitting duty today. As we drove Max and Milo to nursery school, Max asked 'are you going to school now Ma?' 'well no Max' I replied 'grandmas don't go to school'. He thought about this for a bit......'you went to school once didn't you Ma?' long pause........'a long time ago. Christmas was a long time ago wasn't it ? Was that when you went to school?'
Wish me luck in getting to Olympia tomorrow - it involves all sorts of train/tube travel, and with my sense of direction being non-existent, I will probably end up in Oxford. Let's just hope I don't get on Eurostar by mistake and end up in France..........


Tuesday, 15 March 2011

Colouring Chestnut Hair - and a winner

Firstly, I picked a name out of the hat for the cardmaking book, and the name that jumped out was
Lace Top Designs
Congratulations, email me with your address and I will get it posted
I get a lot of emails asking me about colouring hair, so I have done another quick photo tutorial showing how I do it

This little image is Connie from Sugar Nellie. She is a download, so you get her right onto your computer and can start using her straight away. The label die is by Go-Kreate, grandma sentiment oval is by Craftwork Cards and the roses are by Wild Orchid Crafts


I found this ribbon lurking in my ribbon drawer, it was perfect for this card...

Here are the colours I used for her hair:

Chestnut, Cocoa, Cinnamon and Saffron


Start by colouring the darkest parts of her hair in chestnut - at the parting, around the ribbons, in the shadow of her neck........


until you are happy that you have coloured in the parts that would be darkest.........


then using cocoa, go over the parts you have just coloured, extending the colour outwards a little onto the white.........................


Do the same with the cinnamon pen, going over the area already coloured, and extending it out into the white again.................


Go over the whole of her hair with the saffron pen to blend in all the colours, touch up the roots and ends of the hair if necessary with a dark colour again......


and here she is finished.

For her skin, I used coral around the hairline - it looks really dark when it goes on, but don't panic. Blend over that with sunkissed pink, making her cheeks pink and leaving the centre of her face white, then go over the whole lot with blush


Clothes:

Soft peach, peach and apricot

sandstone, tan and caramel


I hope some of you found this helpful. I was going to do a video, but when I got my brand new flip out of the box for the first time (it was a Christmas present), it didn't work. What is it with me and inanimate objects this week? First the window on the car, then at the weekend, the handle on the car door collapsed, now a brand new video has gone on strike. I think I'll stick to paper, glue and scissors, can't go wrong with those.
Look out for a brand new promarker giveaway on here, starting in a few days time


Sunday, 13 March 2011

Sassy Lady

I found these die cut images by Kanban lurking in a drawer - they look very like Loralie fabric ladies, so I couldn't resist them, although I don't normally use pre-printed die cuts. I liked these. The background cardstock is a gorgeous starlight card with a pearly glitter from Craftwork Cards, as is the white scallop square, and the tab, that I folded back and pinned with a flower. I added another cutout flower to her dress with a foam pad, and the border punch is by Martha Stewart


We have had a lovely weekend in Yorkshire, spending time with old friends, lots of good food, wine, and even more laughter. We all have busy schedules, so we got our diaries out, and have fixed up our next two weekends for this year, and were all impressed with our own efficiency.
Are any of you planning on going to the Craft and Stitch show at Olympia (London) this week? If so, I will be helping with the make and takes on the Papercraft Inspirations magazine stand, and would love it if you came up for a chat - don't forget to bring along a cupcake card along, to be in with a chance of winning a bumper prize. I have never done anything like this before, so I need all the support I can get. We will be taking the opportunity to see our family down there, before we head back to the USA, so I am on grandma duty as well this week, it's going to be just a bit busy.
See you tomorrow.....

Friday, 11 March 2011

Polkadoodle friday, and a book review and giveaway......

The challenge this week at Polkadoodles is black, white and one other colour - I chose red, a colour combo I am very fond of on cards.
The digi stamp image of the girl is from the All Around and Everywhere CD from Polkadoodles, I printed her out in black and white all ready to colour in with Promarkers.

The sentiment is a stamp from MFT, and the red and white paper, pleated to look like ribbon is from the Not for Girls CD
Colouring a black outfit is sooooo hard! I had to do it about four times before I was reasonably happy.
If you like a challenge, why not join us this week? Hop over and see what the rest of the design team came up with HERE

I was sent this book to review, a great big chunky book packed full of cardmaking ideas. It is beautifully photographed, and the projects are covered in a step-by-step format. All sorts of techniques are covered - using beads, napkins, heat embossing........and so on. On each page is an idea for a co-ordinating gift wrap. I would say that it is suitable for a beginner/intermediate level crafter rather than an advanced level cardmaker, and it covers the basics very efficiently. If you know anyone who would benefit from this book, I have this copy to give away. Just mention if you would like it in a comment under this post. I will draw a name out of the hat on Monday, and as always will mail worldwide


by Vivienne Bolton


this is a photograph of one of the projects, made with table napkins. I love peonies, so this one caught my eye.......

and here is a gift bag I made using the instructions. Strangely, although the instructions for the cards are very precise and detailed, the instructions for this bag were rather vague and not that easy to understand - I think she was making the point that the size of the bag depended on the size of the paper used. It would have been nice to be given precise instructions for a trial bag, so that you could then adapt the sizing more easily.
Having said that, it's a cute gift bag....... of course I had to adapt it. I made a flap for the front and scalloped that. The bag is closed with a velcro dot.


with a nice gusseted side. This one was made with a 12 x 12 sheet of paper


So there you go. If you would like to try 50 new projects, or know someone who would, leave me a comment to let me know.
We are off to see old friends of ours in Yorkshire this weekend, that is if the car is mended - I drove into a multi storey car park yesterday, pressed the button to wind the window down to take the ticket, wound it back up, and CRASH there was the most almighty bang as the window dropped like a stone into the door. There was a noise of broken glass. Oh dear. I went to pay - it cost me £2.30 and I was only in the car park for 2 minutes! It's now in the garage waiting for new bits, so watch this space


Tuesday, 8 March 2011

Altered box......

When I was at CHA, I found a company called Heartfelt Creations, who make this fabulous product - spellbinders flower dies (made specially for them) and matching stamps to add detail to your cut flowers. The sample cards on their stand were just gorgeous, (take a look at their website for heaps of inspiration) and I was really excited when they gave me this set called Posy Patch, to play with....

I decided to use the very smallest tiniest die for my first project, and wanted to make something that looked like a hydrangea. I cut the flowers out of white card, and coloured the stamped images with promarkers, I used various shades of blue, pink and aqua to make it look realistic, and coloured the centres with a few strokes of a buttercup marker. I painted the inside and out of a tiny MDF box from Hobbycraft in white, and die cut two scallop circles just bigger than the base and lid from DCWV blue spotty paper.
The base of the flower was a wooden ball with a flat base - also from Hobbycraft, I think you would be able to get something similar from most big craft stores. I coloured the ball quickly with the wedge end of a green promarker before sticking on all the tiny blossoms with a glue gun....
the leaves were handcut....


a little circle of paper finishes off the inside, and a Martha Stewart punched border pretties up the painted box


I really like this finished project, and will be stamping and cutting a LOT more of these flowers, so watch this space..
It's a glorious day here today, cloudless blue sky and sunshine, I hope Spring has sprung